INTRODUCTION
In this guide, we will take you through how to connect a neqto: device to Niagara Framework step-by-step.
The Niagara Framework is a complete management and control solution, and it's the market-leading platform to create smart buildings. From security to elevators to HVAC to lighting, Niagara enables comprehensive monitoring and management of every building facility aspect.
neqto: is a fully managed service where the business logic is written in simple JavaScript, and edited and deployed from our cloud console. The neqto: edge-to-cloud IoT solution supports over 200 sensors, and can autonomously control connected switches and relays at the edge. It also supports PWM control. neqto: powered devices are small yet capable and can even be battery powered. They connect to the cloud either over a cellular or a Wi-Fi connection.
neqto: devices are now ready to be used with Niagara. Due to their tiny footprint, cellular and Wi-Fi capabilities, and the option to operate on battery power, it makes them an excellent complement to existing solutions, and they enable new use-cases.
It is now possible to extend your Niagara smart building solution to monitor additional locations such as a parking garage, the area surrounding your building, or use it as a compact on-prem option where space is limited. neqto: also enables completely new use-cases for Niagara users. For instance, it's now possible to remotely track and monitor assets and shipments, to control a complete cold-chain, from bulk storage to refrigerated trucks to its destination.
As this guide will show, neqto: devices can connect and send sensor data to the Niagara Framework.Your neqto: device can either be a neqto: Bridge series device or a Sony Spresense device with the neqto: Engine installed.
Read more about the neqto: hardware here: https://neqto.jig-saw.com/en/product/hardware.
SETUP
There are two ways to integrate a neqto: device with Niagara.
- HTTPS (oBIX) - Niagara acts as an oBIX server, so a neqto: device can get/subscribe data from it, set attribute value, and invoke operations by acting as an oBIX client.
- MQTT - The Niagara host and the neqto: device can act as MQTT clients to a separate MQTT broker, and exchange data (publish/subscribe) through it.
The entire setup can be prepared within 10 minutes for either of the integrations.
oBIX
oBIX (open Building Information eXchange) is a focused effort by industry leaders and associations working toward creating a standard XML and Web Services guideline to facilitate the exchange of information between intelligent buildings, enable enterprise application integration and bring forth true systems integration. Based on standards widely used by the IT Industry, the oBIX guideline will improve operational effectiveness giving facility managers and building owners increased knowledge and control of their properties. Comprised of representatives from the entire spectrum of the buildings systems industry, oBIX includes professionals from the security, HVAC, building automation, open protocol and IT disciplines. For more details visit here.
Niagara oBIX driver meets Committee Specification 1.0 under the specification document identifier obix-1.0-cs-01.
Requirements for oBIX Integration
Niagara Requirements for oBIX Integration
- A target Niagara host (JACE-8000 or Supervisor)
- License: License file with the "web" feature and “obixDriver” feature, which must contain the attribute “export=true”
- Modules:
web,obix,obixDriver - Software: Niagara N4 (including Niagara Workplace)
neqto: Requirements for oBIX Integration
- A neqto: device (neqto: Bridge or Sony SPRESENSE)
Niagara Setup for oBIX Integration
A. Create certificates for SSL/TLS (self-signed certificate)
This step can be skipped if using un-encrypted mode. The CA certificate will be created using Niagara Workplace (configuration tool for Niagara Host). OpenSSL can be used instead. The server certificate will be created in the Niagara host which can be accessed by Niagara Workplace.
I. Create the CA certificate and export the CA public key with Niagara workplace.
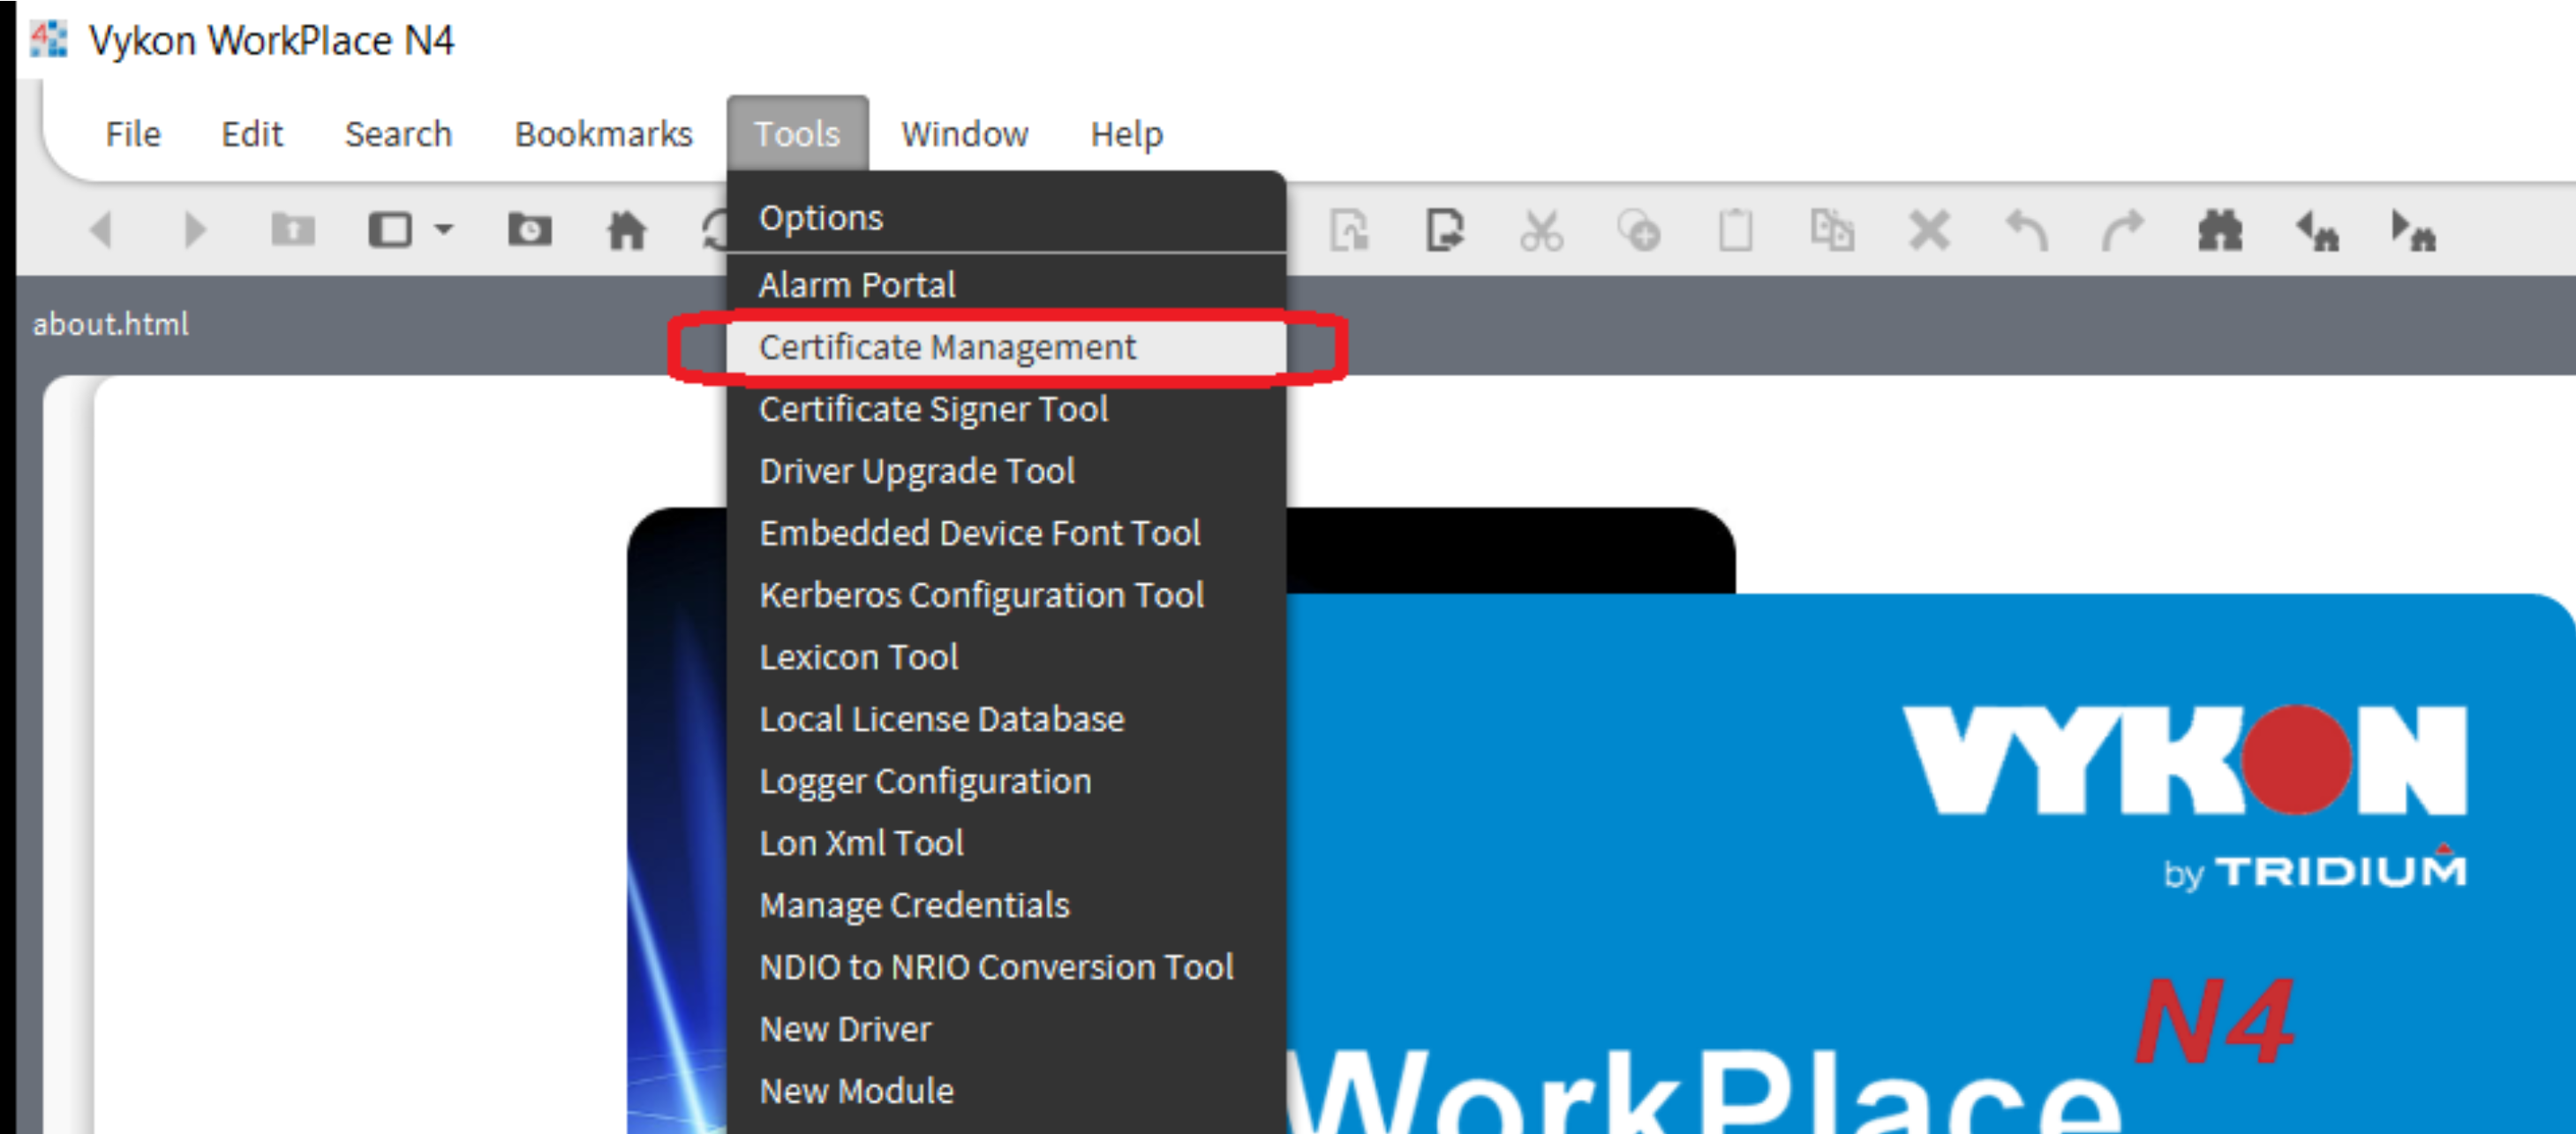
- In Workplace menu, navigate to Tools -> Certificate Management
-
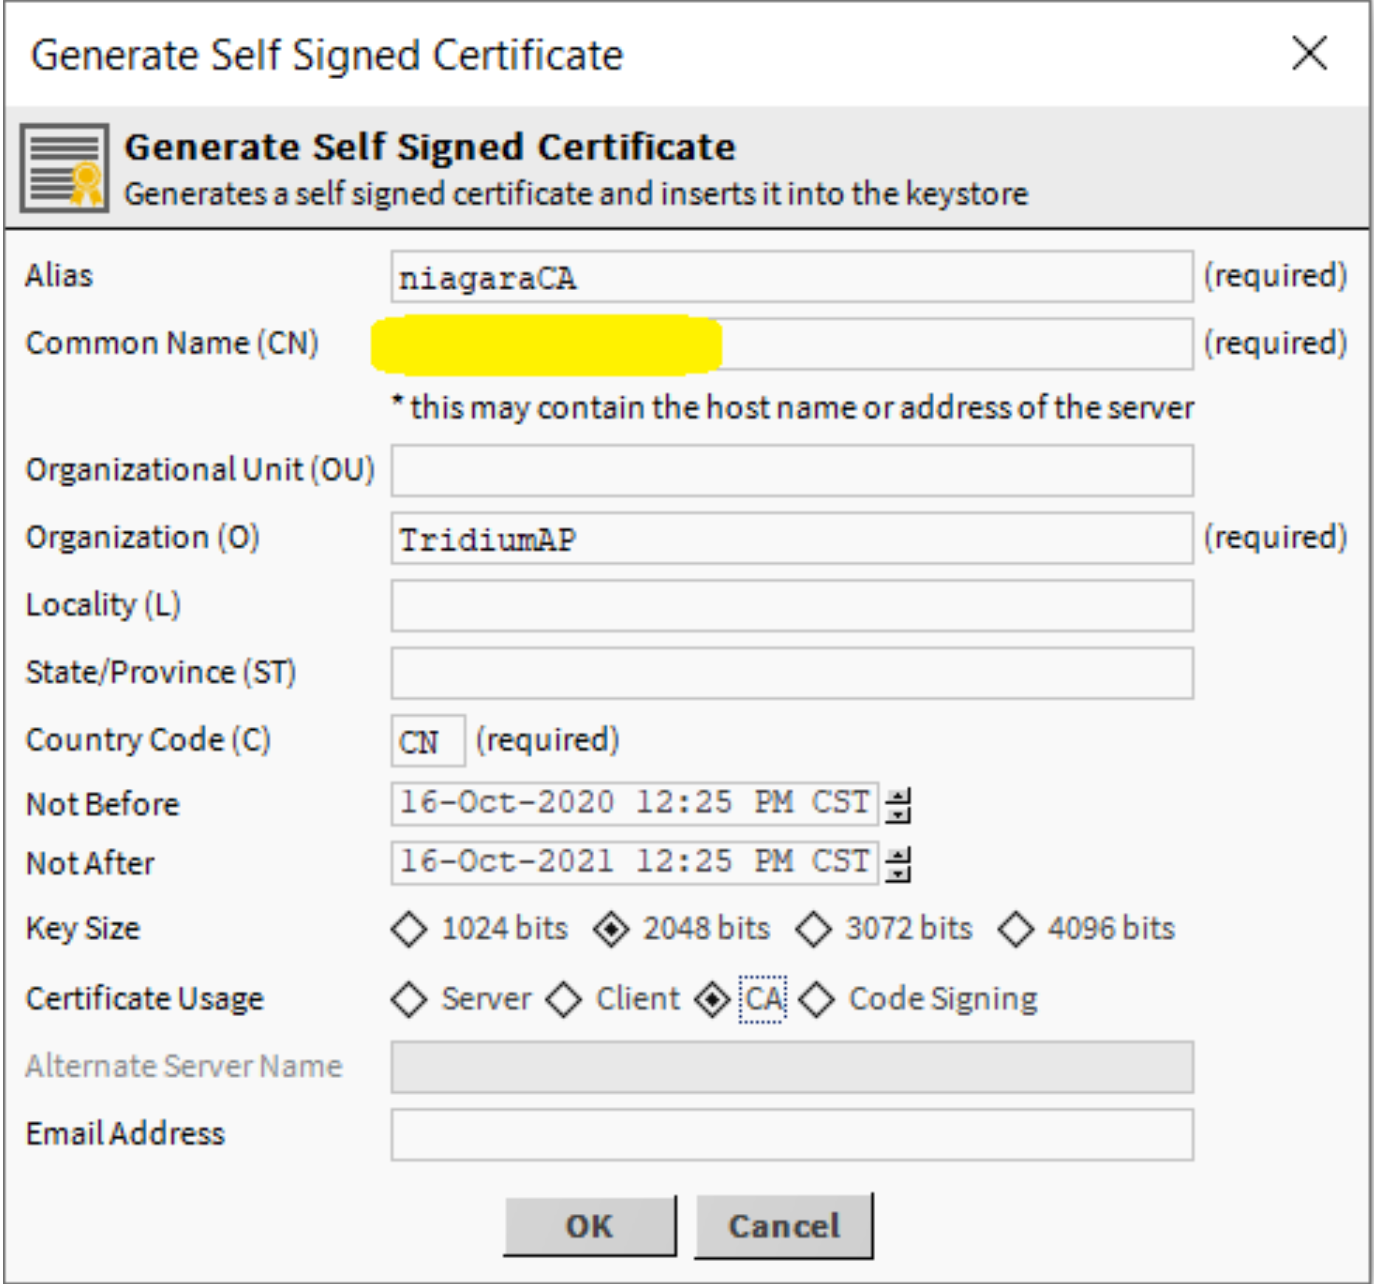
In user key store, click the New button to create a new CA certificate with the necessary information including private key password (see Figure 1).
- Please Note: the Common Name (CN) should contain the host name or the address of the server, and ensure to select the "CA" Certificate Usage.
- In user key store, select the CA certificate created in the last step, and click on the Export button to export the CA public key.
- Please ensure that the "Export the public certificate" checkbox is checked, and the "Export the private key" checkbox is un-checked.
II. Create a station in Niagara host (JACE-8000 or Supervisor).
This is a basic operation for Niagara user, so please find guides in the help documents if you don't know the steps.
III. Create the Server certificate and the Certificate Signing Request (CSR) in the Niagara host.
-
Open the User Key Store from within the target Niagara station’s Platform Services
- Make a secure connection to the station.
- Expand Config -> Services -> Platform Services.
- Open the "Certificate Management Tool" by double clicking on "CertManagerService".
- Select the "User Key Store".
-
In user key store, click the New button to create a new server certificate with the necessary information.
- Please note: the Common Name (CN) should contain the host name or the address of the server, and ensure to select the "Server" Certificate Usage.

- In user key store, select the Server certificate created in the last step, and click the Cert Request button to generate the Certificate Signing Request.
IV. Sign the Server Certificate
Back in the Workplace menu,
- Navigate to Tools -> Certificate signer tool.
- Select the CSR file by clicking the folder next to text field
- Select the CA certificate which created in step I
- Enter the password
- Select OK to sign the certificate
The "PEM" file of the server certificate will be returned.
NOTE: neqto: does NOT allow bare IP address as Subject Alternative Names. It is advisable to un-check the "X509v3 Subject Alternative Name" extension.

V. Import the Server Certificate to Niagara Host
- Open "User Key Store" within the target station's "Platform Services".
- Click on the import button and select the server certificate in PEM format which we was signed in step IV.
B. Assign the signed server certificate for Niagara Station's webService which is used by the oBIX Server
- Make a secure connection to the station.
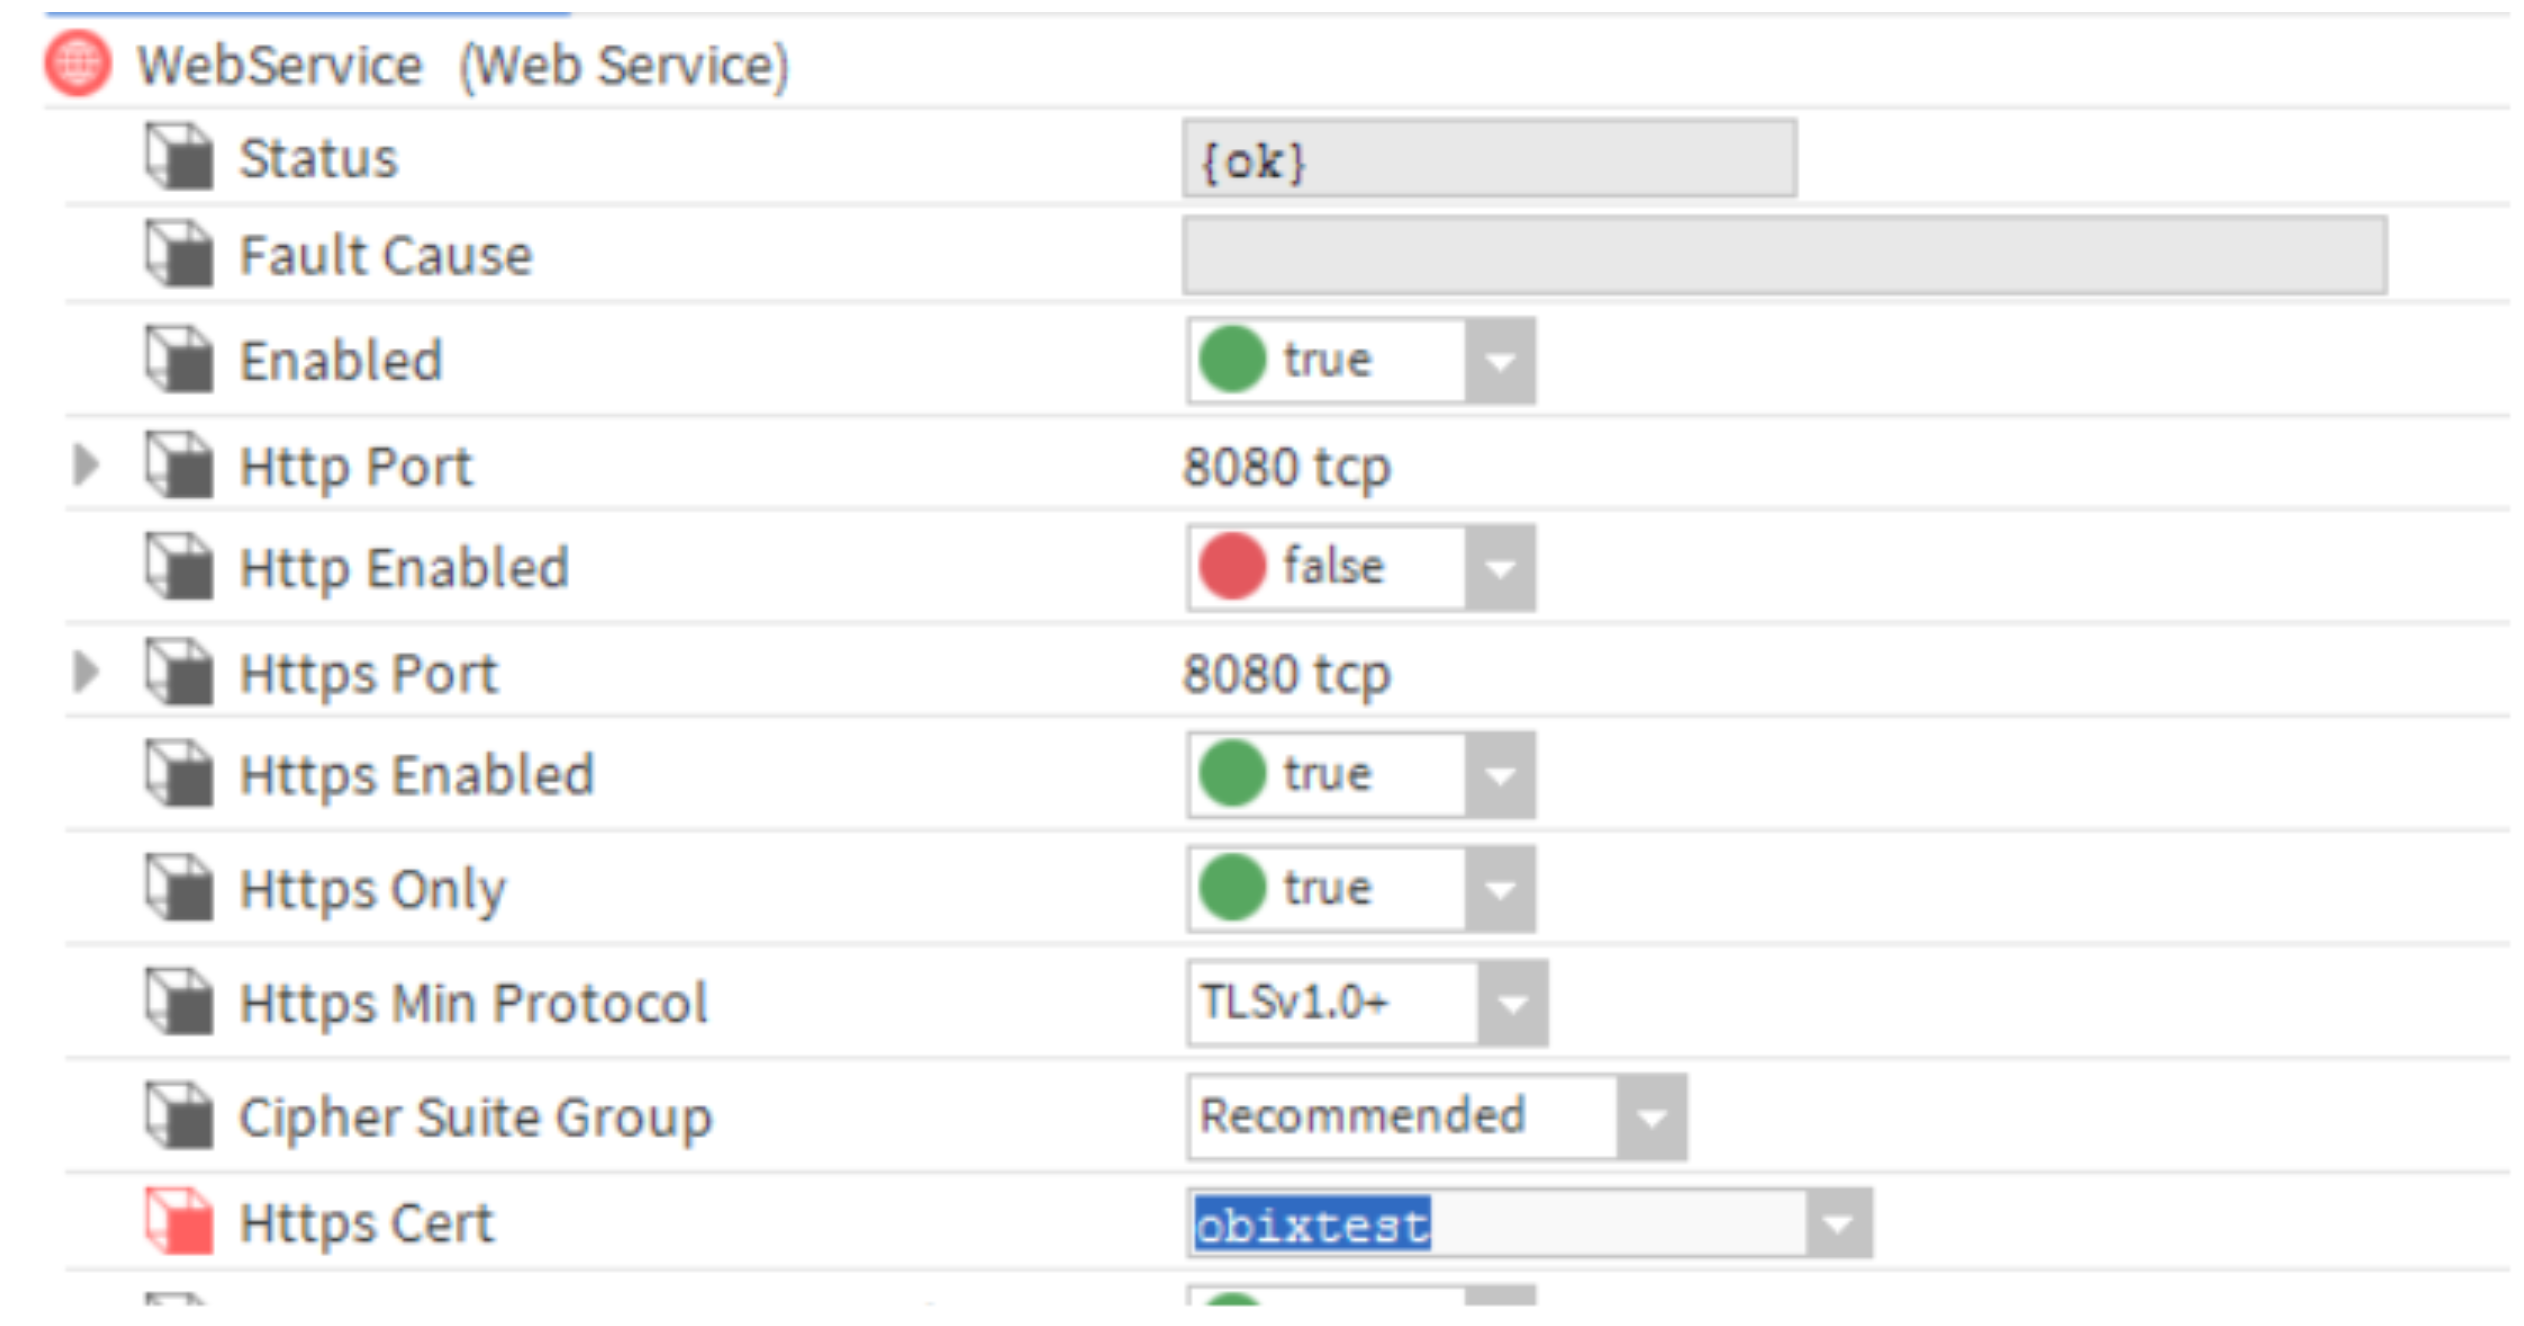
- Expand Config -> Services -> WebService.
- From the HTTPS Cert Dropdown, select the signed certificate and save.
- Make sure that "HTTPS Enabled" is set to true.
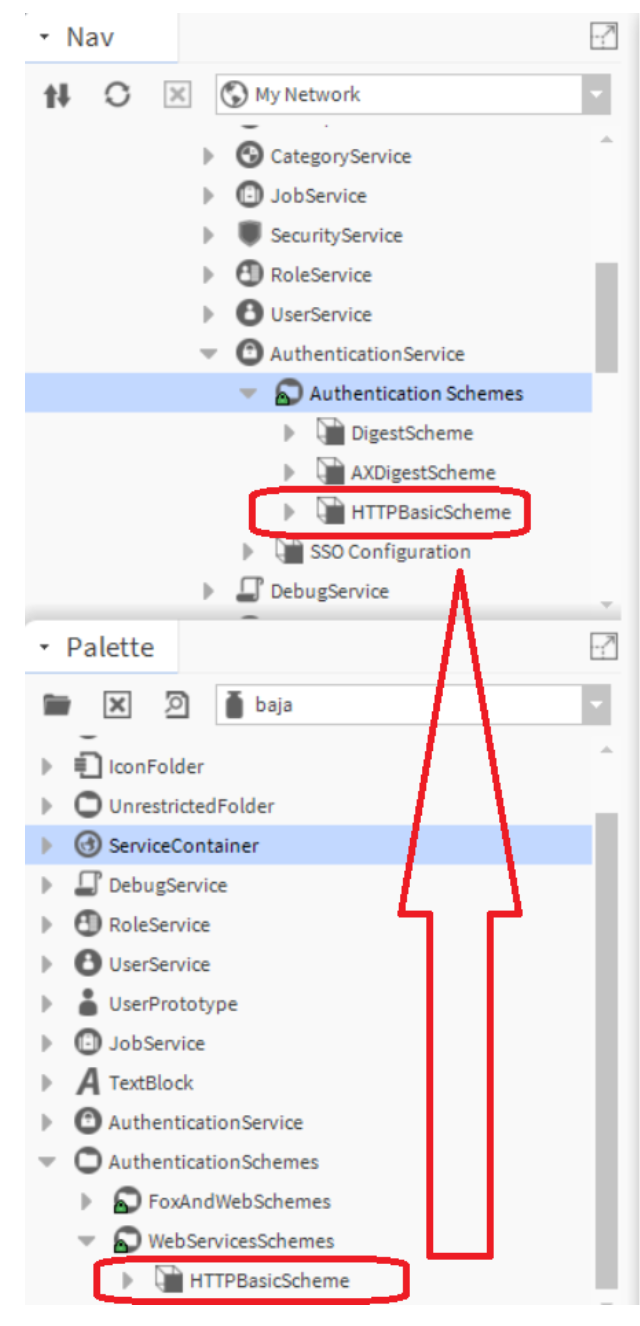
C. Create a "HTTP Basic Authentication Scheme" for Niagara Station
- Make a secure connection to the station.
- Expand Config -> Services -> AuthenticationService -> Authentication Schemes.
- In Workplace, navigate to Window -> Side Bars -> Palette to open the Palette side bar.
- Select the
bajamodule. - Expand the AuthenticationSchemes/WebServiceSchemes
- Drag the "HTTPBasicScheme" to the Authentication Schemes in the station.
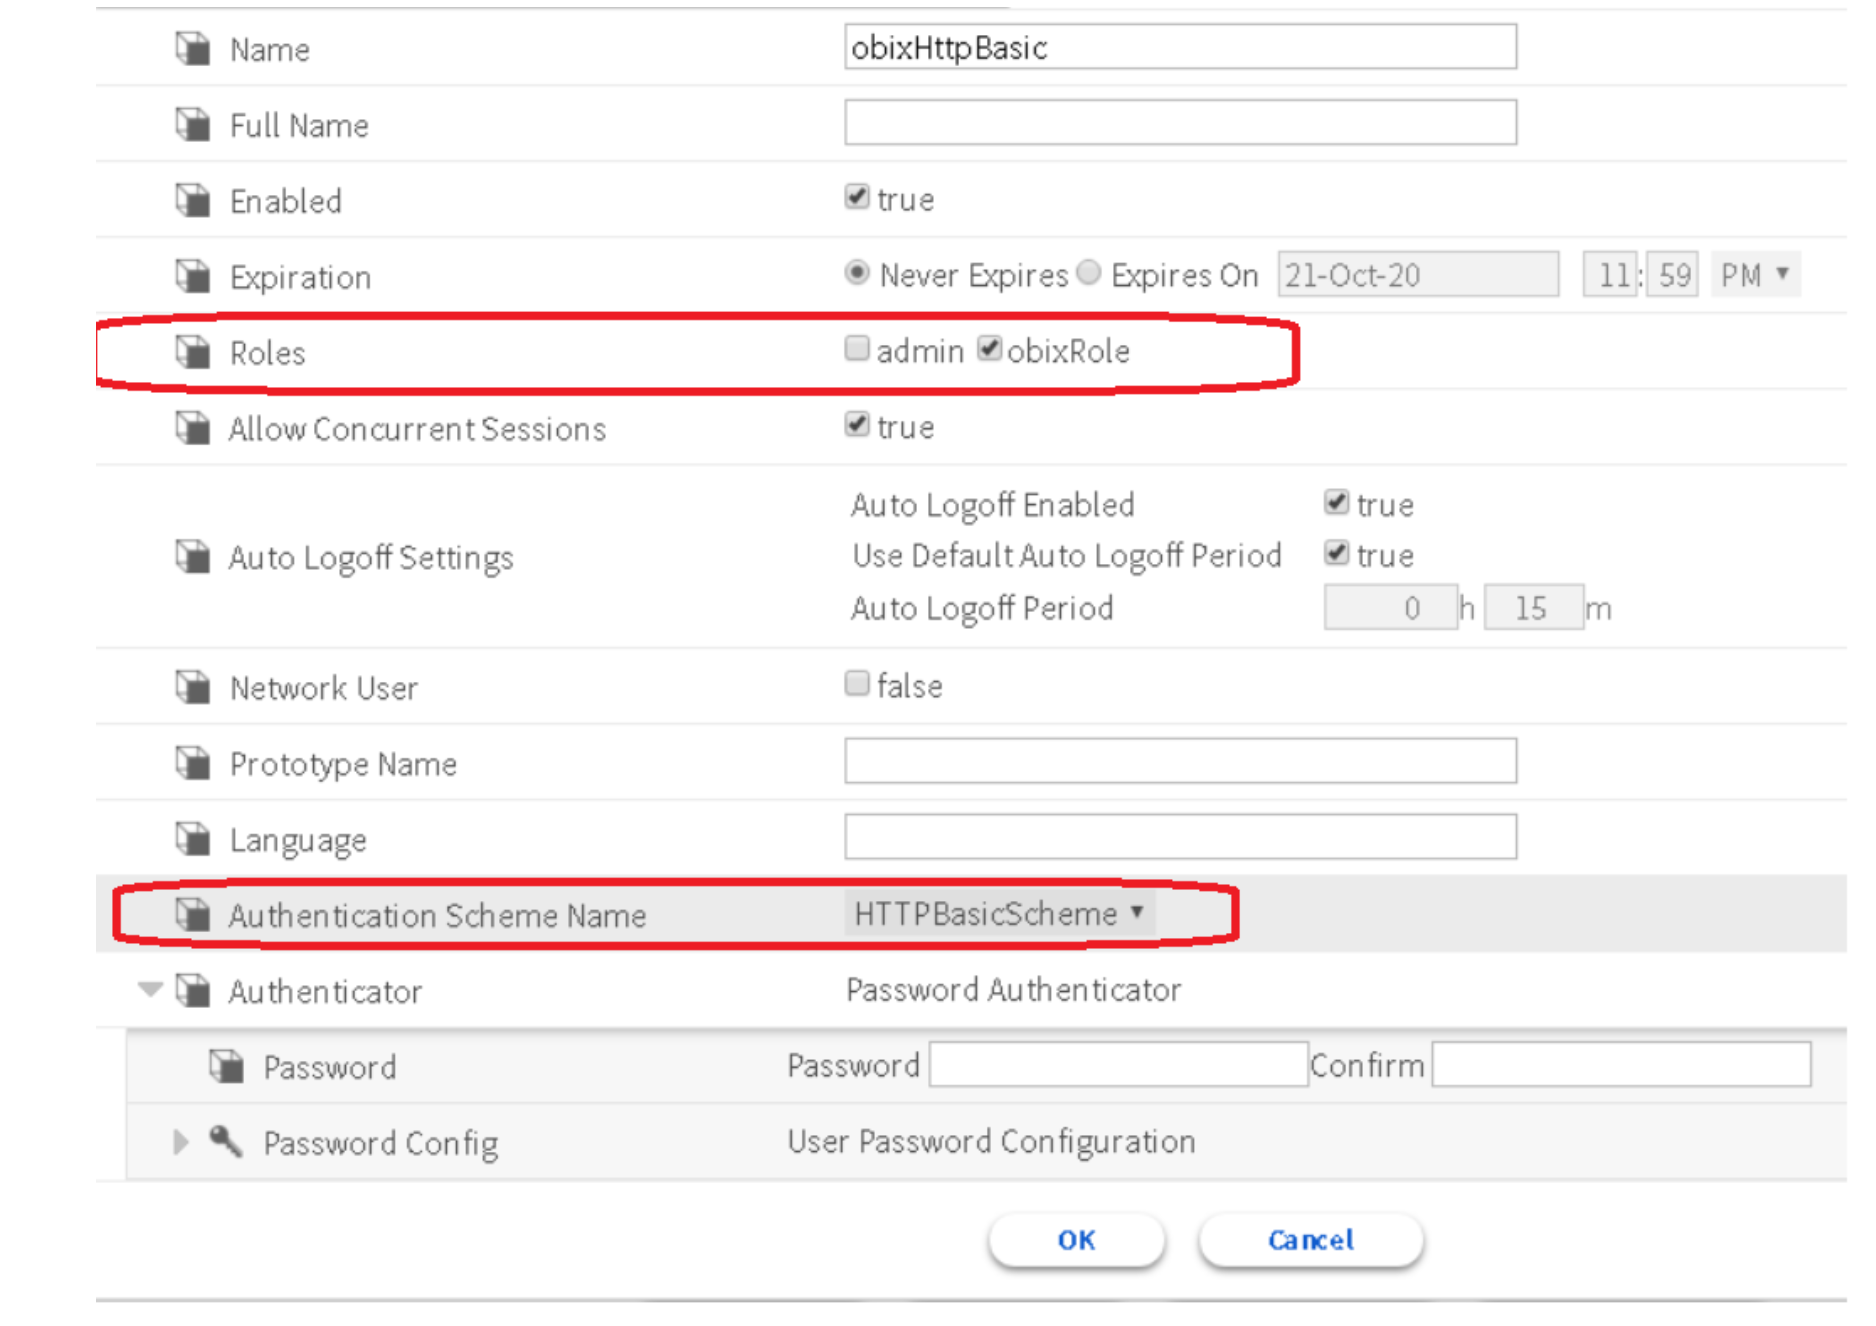
D. Create a user in the UserService, and assign the "HTTPBasicScheme" to the user
- Make a secure connection to the station.
- Expand Config -> Services -> UserService
- Double click it to open the "User Manager".
- Create a new user by clicking the New button.
- Fill up necessary information.
- From the Authentication Scheme Name dropdown, select "HTTPBasicScheme".
NOTE: Make sure the user has the right permissions to access the components in the station.
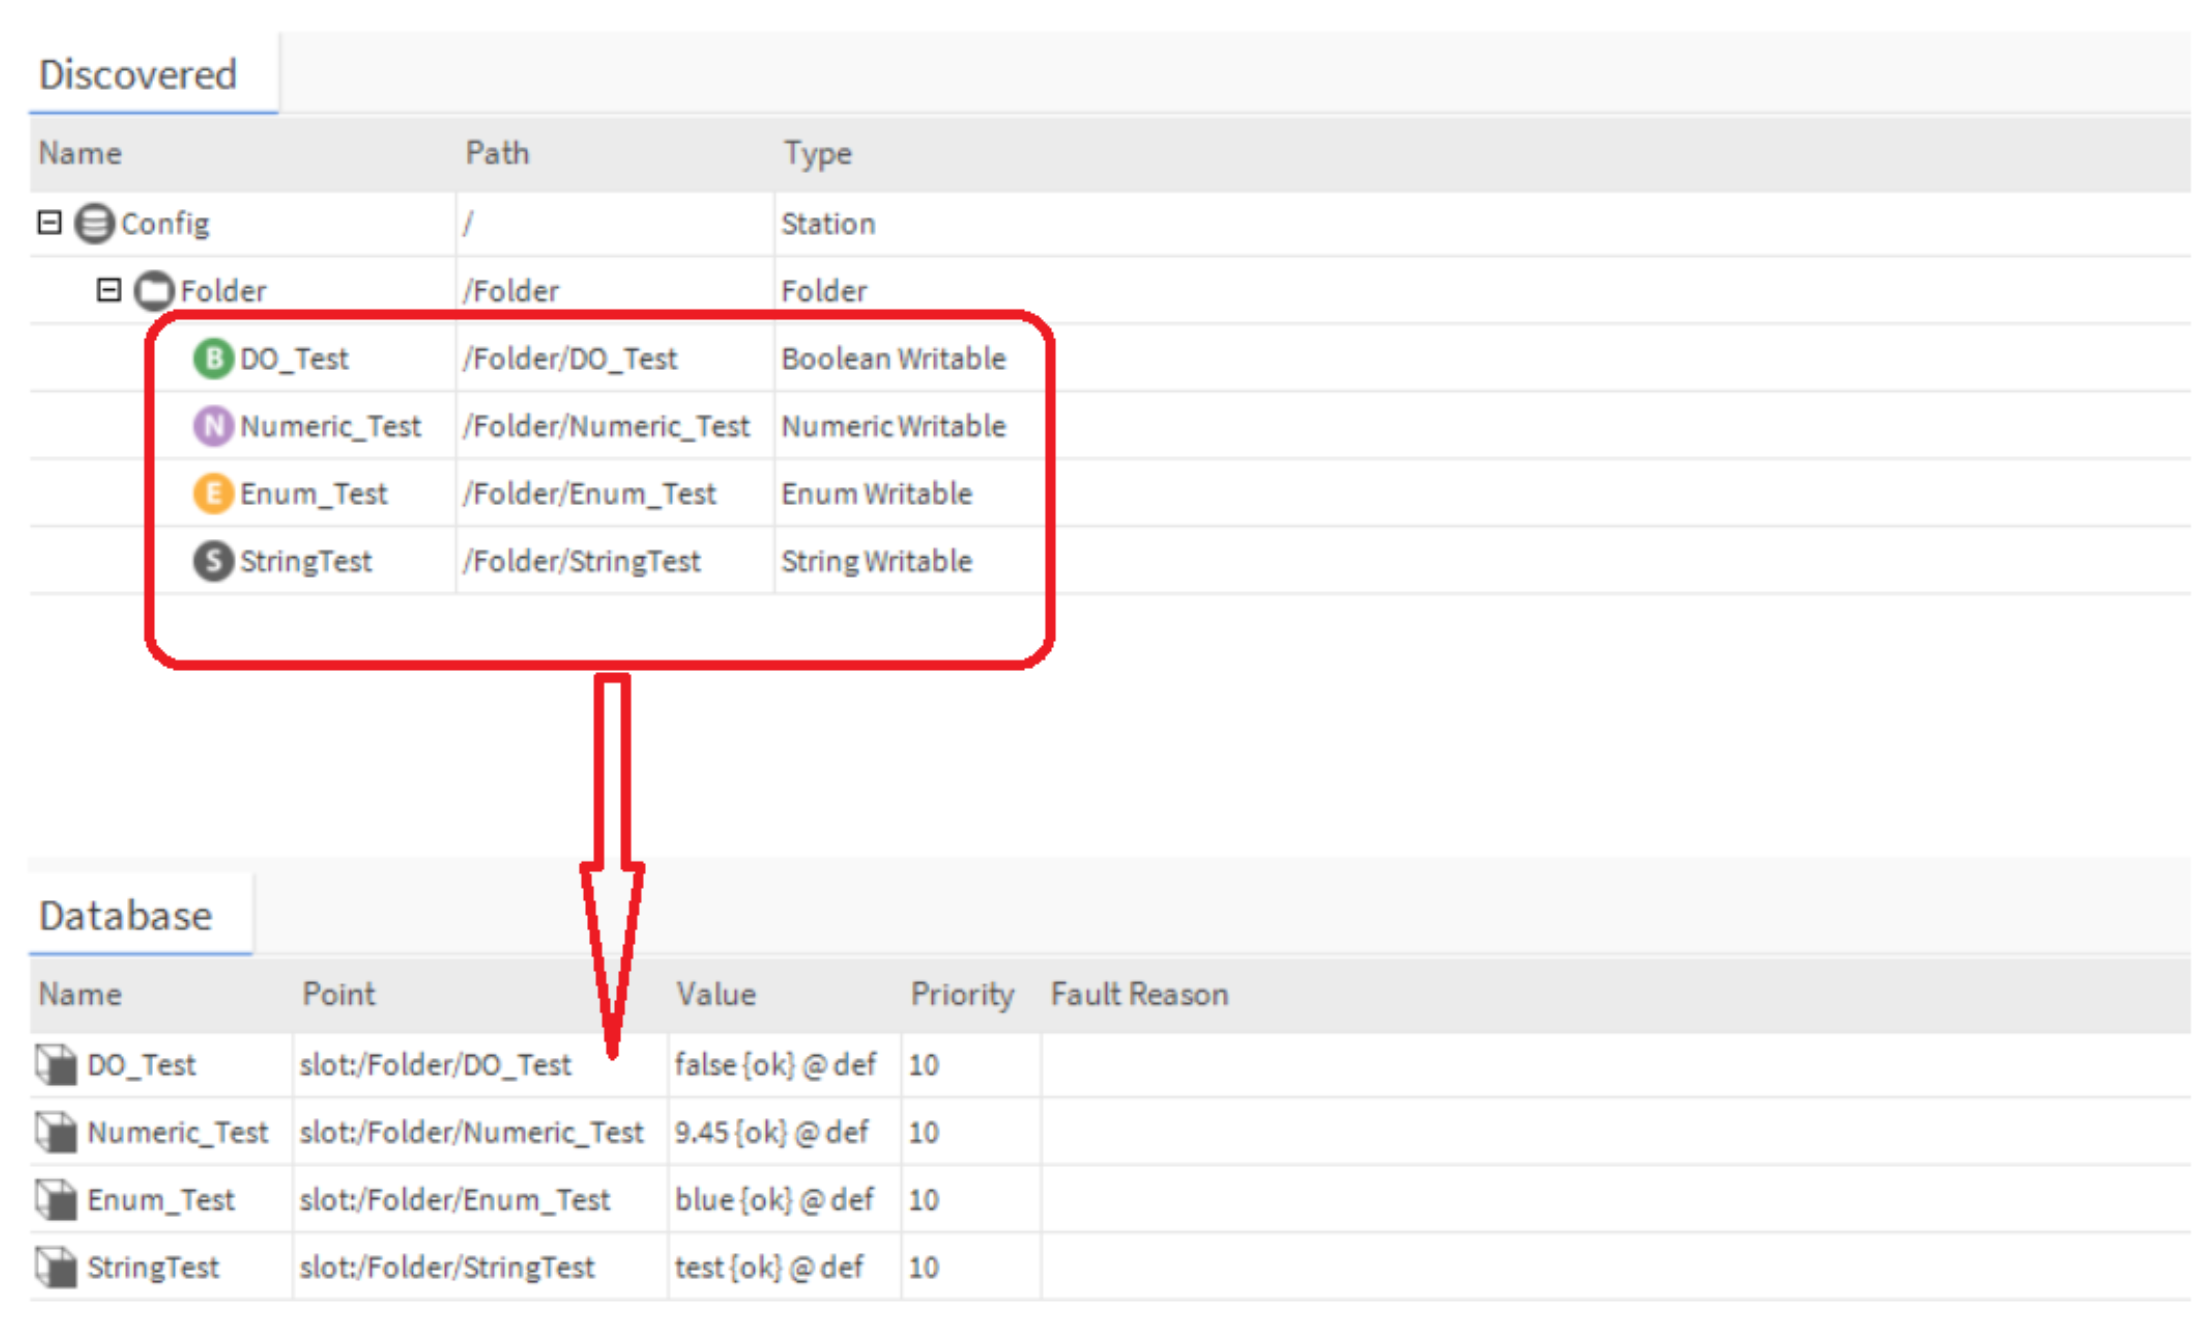
E. Create the oBIX export objects
- Make a secure connection to the station.
- Expand Config -> Drivers, double click it to open the "Driver Manager".
- Click New button, and select "ObixNetwork" to create an ObixNetwork.
- Double click the Exports folder under the ObixNetwork to open the "Obix Export Manager".
- Click the Discover button, all the station points will be shown in the "Discovered" table.
- Drag the components into the "Database" table.
F. Set below parameters in the oBIX client<
- Entry point. Eg, https://xxx.com:8080/obix/config/Folder
- user credential
- CA public key file
NOTE: if using chrome browser as a oBIX client to get the components, please assign a "DigestScheme" to the user.

neqto: Setup for oBIX Integration
neqto: Setup for sending data to the Niagara host is as simple as,
1. Copying the (oBIX) integration snippet from the documentation page (here).
2.Setting the parameters,
-
1.CA: The self-signed CA created in the first step 1.1 of Niagara setup. Please replace the literal newlines with the character
\n.2.USERNAME and PASSWORD: The user credentials to authorize the connection to the oBIX server. 3. HOST and PORT: The address and the port of the Niagara host/server.
4. PATH: Path of the element to write data to.
3. Copying the oBIX sample code (<a href="http://docs.neqto.com/docs/en/snippets/niagara/#sample-1" target="_blank">here</a>) from the neqto: documentation.

4. Customizing based on user requirement.
5. Running the script.
MQTT
MQTT is an OASIS standard messaging protocol for the Internet of Things (IoT). It is designed as an extremely lightweight publish/subscribe messaging transport that is ideal for connecting remote devices with a small code footprint and minimal network bandwidth.
Niagara and neqto: MQTT drivers support MQTT v3.1.1 protocol standard.
Requirements for MQTT Integration
Niagara Requirements for MQTT Integration
- A target Niagara host (JACE-8000 or Supervisor)
- License: License file with the "MQTT" feature
- Modules: abstractMqttDriver.jar
- Software: Niagara N4.2 or later (including Niagara Workplace)
neqto: Requirements for MQTT Integration
- A neqto: device (neqto: Bridge or Sony SPRESENSE)
MQTT Broker
In order to make the integration between Niagara and neqto:, a separate MQTT broker has to be hosted and connected to Niagara.
A. Create a broker instance
Niagara can integrate with many MQTT brokers. This tutorial shows the configuration of Artemis in a Windows server.
Please find more details about Artemis here.
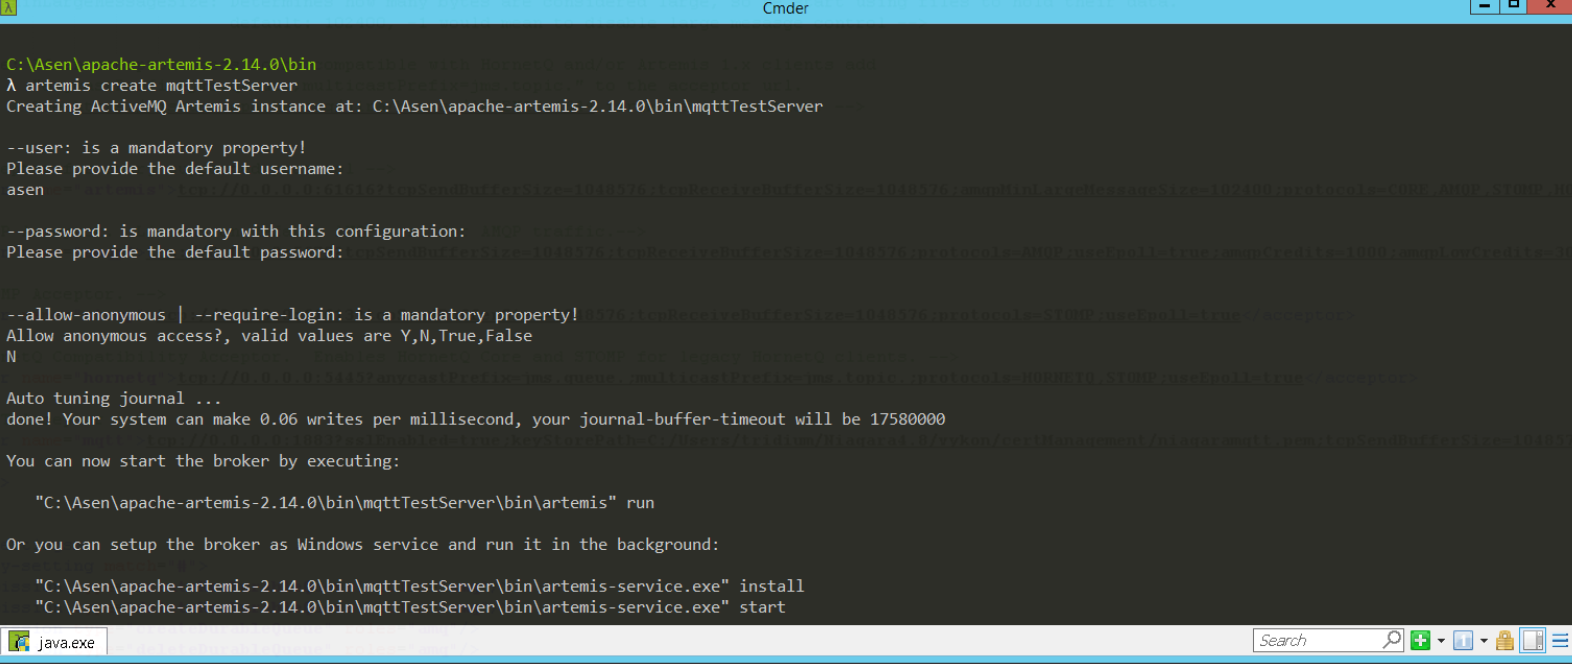
After downloading and unzipping the Artemis software, please follow these steps.
NOTE: The following commands are executed from the `\bin` folder of the extracted folder from the Windows command line (CMD).
- Create a broker instance using
artemis create <brokerName>. - Set the username/password and decide whether to allow anonymous access.
- Artemis will create a folder named </em> under the
\binfolder. - Start the broker with
"<brokerName>\bin\artemis" run.
B. Create certificates for SSL/TLS (self-signed certificate)
Please refer to the corresponding section above, Certificate Creation for oBIX Integration.
C. Convert the PEM format certificate to JKS format
The certificate generated by Niagara is a PEM file, while Artemis requires a JKS format certificate.
Please refer to this documentation.
D. Edit the broker.xml file located in the broker instance/etc to enable ssl on MQTT
- In broker.xml, find the "MQTT Acceptor" node, and add the SSL configuration sections like below:
<acceptor name="mqtt">
  tcp://0.0.0.0:1883?sslEnabled=true;keyStorePath=C:/Users/tridium/Niagara4.8/vykon/certManagement/niagaramqtt.jks;keyStorePassword=Admin12345;tcpSendBufferSize=1048576;tcpReceiveBufferSize=1048576;proto cols=MQTT;useEpoll=true
</acceptor>
- Add the topic in the addresses node or set "auto-create-addresses" to true, then the broker will create the address requested by the MQTT client if it does not exist already.
<addresses>
  <address name="DLQ">
    <anycast>
      <queue name="DLQ" />
    </anycast>
  </address>
  <address name="ExpiryQueue">
    <anycast>
      <queue name="ExpiryQueue" />
    </anycast>
  </address>
  <address name="niagaraMqttNumber">
    <multicast>
      <queue name="niagaraMqttNumberQueue" />
    </multicast>
  </address>
  <address name="niagaraMqttBoolean">
    <multicast>
      <queue name="niagaraMqttBooleanQueue" />
    </multicast>
  </address>
  <address name="niagaraMqttString">
    <multicast>
      <queue name="niagaraMqttStringQueue" />
    </multicast>
  </address>
  <address name="niagaraMqttEnum">
    <multicast>
      <queue name="niagaraMqttEnumQueue" />
    </multicast>
  </address>
</addresses>
E. Restart MQTT broker service<
F. Set below parameters in the MQTT client
- Entry point (IP address) -User credentials
- CA public key file
- Connections Type: This guide uses One-Way SSL. (Niagara 4.9 also supports AWS MQTT Authentication, a Two-Way SSL.)
Niagara Setup for MQTT Integration
- Create a Niagara station in the Niagara host.
- Import the CA public key file to the station user trust store.
- Make a secure connection to the station.
- Expand Config -> Services -> PlatformServices -> CertManagerServices, double click it to open the "Certificate Manager".
- Navigate to the User Trust Store
- Create MqttDriver Network
- Make a secure connection to the station.
- Expand Config -> Drivers, double click it to open the "Driver Manager".
- Click New button, and select the " AbstractMqttDriverNetwork" option to create a AbstractMqttDriverNetwork.
- Create MqttDriver Device
- Double click the AbstractMqttDriverNetwork to open the MQTT device Manager.
- Click New button to create a driver device.
- Fill up necessary information: Broker IP, port, connection type, and user credential.
- The connectivity can be tested by right clicking the "Driver", Driver Device -> Actions -> Connect.
- Add publish points.
- Double click the "Points" folder under the MQTT driver device to open the "MQTT Client Driver Point Manage".
- Click the Discover button - all the station points will be shown in the "Discovered" table.
- Drag the points for that are needed to the below database table.
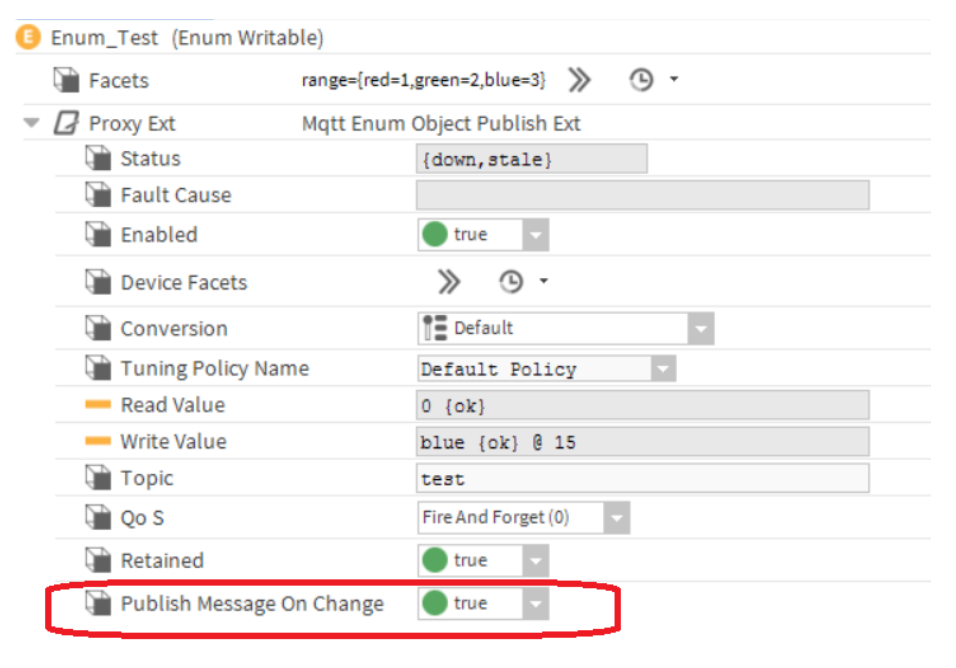
- Fill up necessary information, like name, type, and topic.
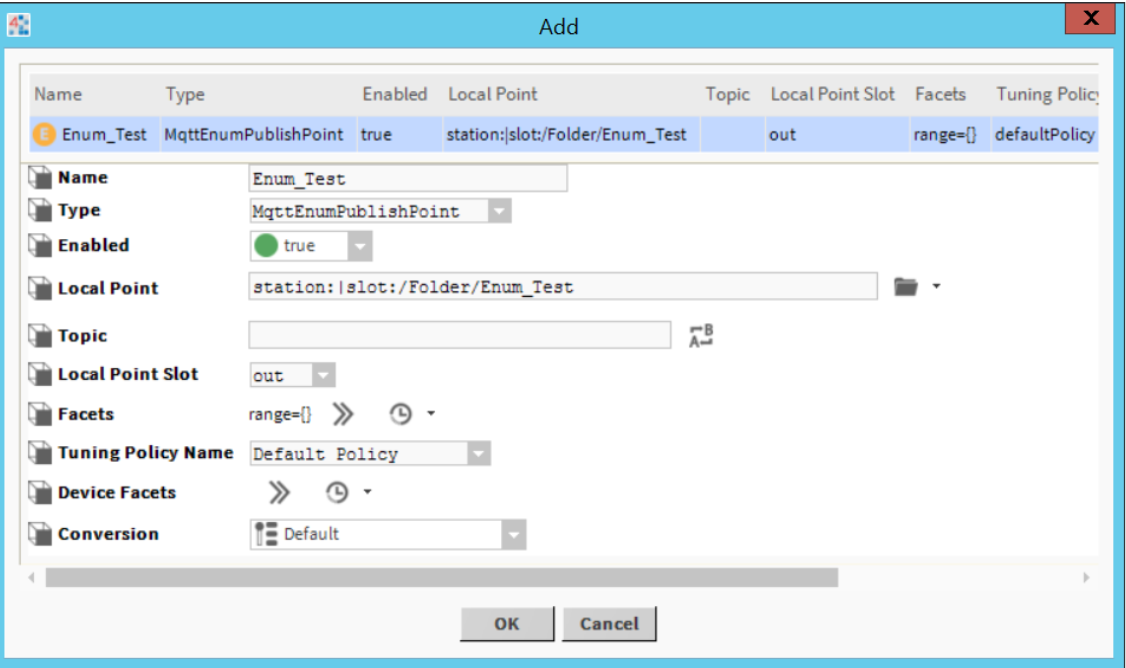
- Set the Publish Message on Change - it can also be disabled and be done manually.
- Add subscribe points.
- Double click the "Points" folder under the MQTT driver device to open the "MQTT Client Driver Point Manager".
- Click the New button and select the proper "Subscribe" type point to add:
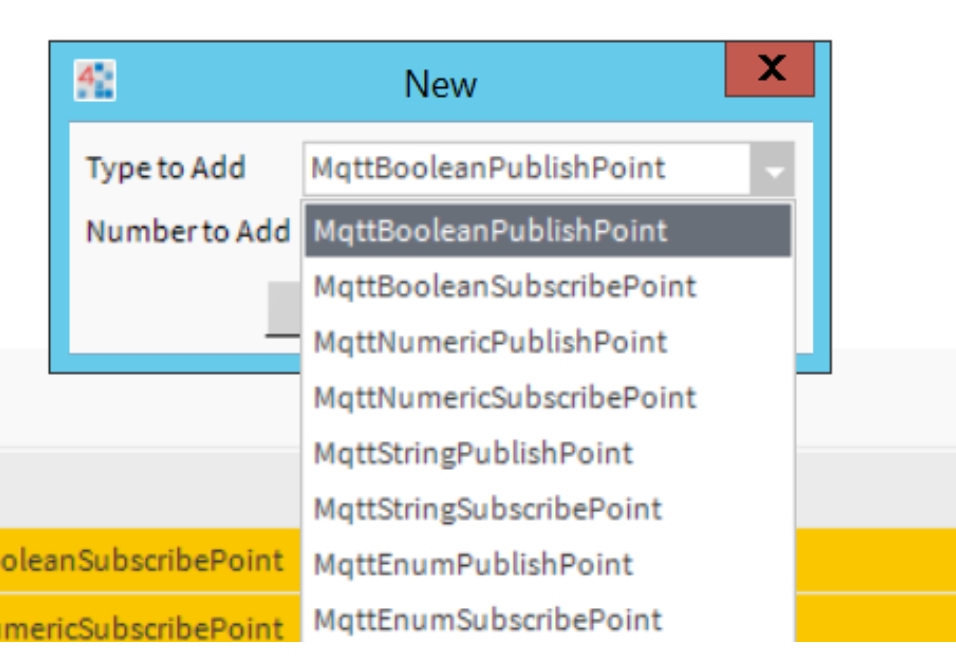
3. Fill up necessary information, like <em>name</em>, and <em>topic</em> - the point will subscribe the topic.
neqto: Setup for MQTT Integration
The setup to enable a neqto: device to send data to Niagara via MQTT is essentially an MQTT client connected to the broker setup earlier. It involves the following steps.
- Copying the (MQTT) integration snippet from the documentation page (here).
- Setting the parameters,
- CA: The self-signed CA created in step 2 of MQTT broker setup. Please replace the literal newlines with the character
\n. - USERNAME and PASSWORD: The user credentials to authorize the connection to the MQTT broker set in step 1.2 of the MQTT broker setup.
- HOST and PORT: The address and port of the MQTT broker.
- CA: The self-signed CA created in step 2 of MQTT broker setup. Please replace the literal newlines with the character
- Copying the MQTT sample code (this or this) from the neqto: documentation.
- Customizing based on user requirement.
- Running the script.
CONCLUSION
Thank you for following this step-by-step guide to connecting your neqto: device to Niagara. We hope it was easy to follow along. If you have feedback, comments, or need help, please feel free to reach out to us, and we'll be happy to support you.
Please refer to the documentation page for sample codes to use neqto:-Niagara integration.